Decision Table

Selecting the Decision Table button in the Decision Logic Subribbon opens the decision table boxed expression editor.
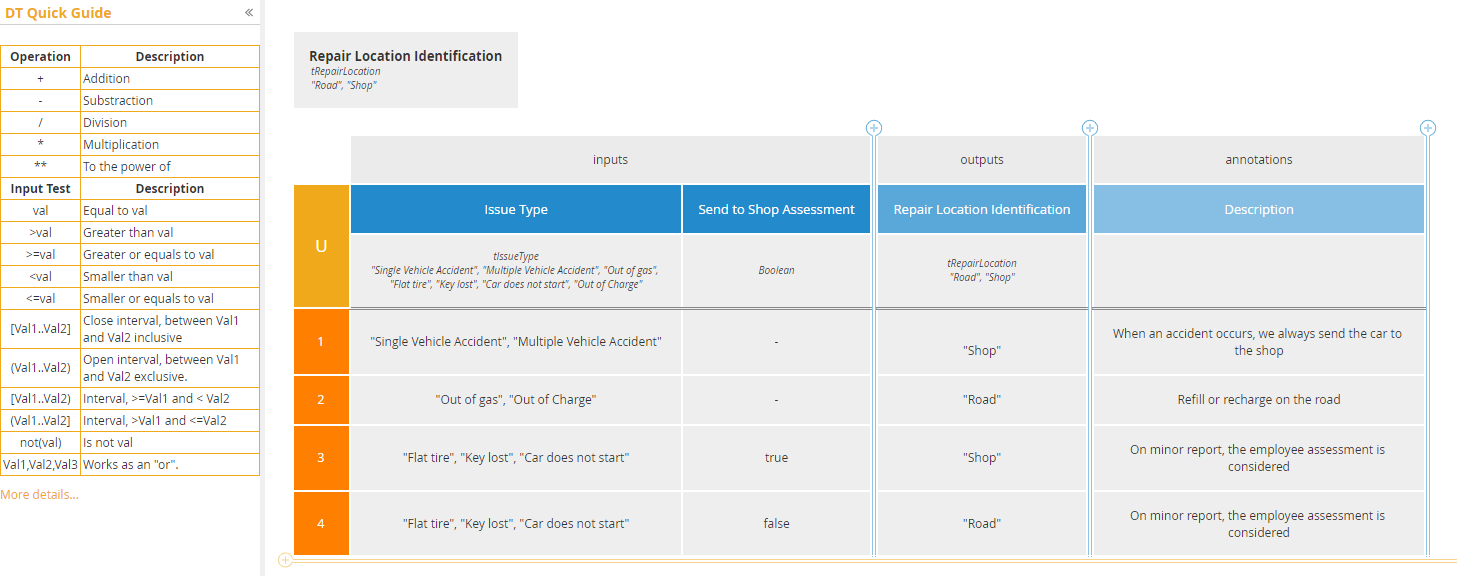
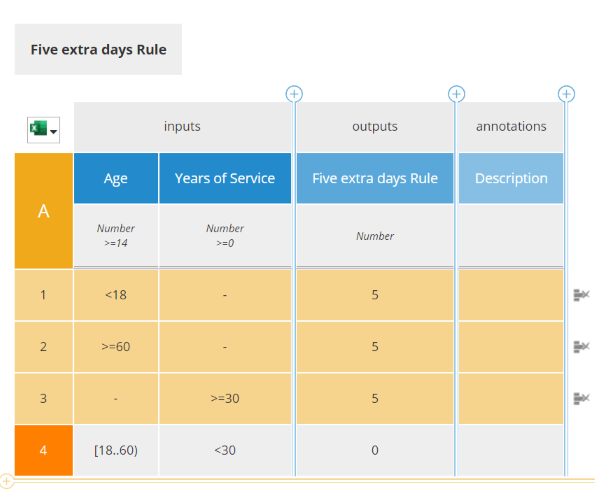
If the decision shape in the DRD has information requirements and a decision name and type, those will appear automatically as the input and output column headings. Below the input and output headings are a numbered list of decision rules. Each input cell in a rule (input entry) is a Boolean condition combining the variable named in the input heading (input expression) with a simple unary test in the input cell. For example, rule 1 column 1 represents the test Issue Type = “Single Vehicle Accident” or “Multiple Vehicle Accident”, true or false. If all input cells in a rule evaluate to true, the rule is said to match and the FEEL expression in the output cell (output entry) is selected as the decision table output. If multiple rules match, the hit policy code in the upper left corner of the table (here “U”) is used to select the output value.
The output entry may be any FEEL expression. The Operation section of the DT Quick Guide to the left of the decision table lists the FEEL arithmetic operators. They may be used in the output entry but not in input cells with simple unary tests. Actually, any FEEL function or operator may be used in an output entry.
Entering expressions in the input and output cells uses the same Expression Editor described in the Literal Expressions section.
A hyphen character in an input cell means the input is not used in this rule; the cell is true by default.
The Description column is merely an annotation of use to the modeler. It is not used in execution.
Simple Unary Tests
The Input Test section of the DT Quick Guide shows what is allowed in a simple unary test. In that panel, val can be either a literal value or a variable name in scope of the decision. In a simple unary test, it may NOT be any FEEL expression other than the ones listed. While this severely limits what you can enter in the input cell, it allows the table to be analyzed for completeness and consistency, as is provided by the Method & Style DT Analysis feature.
A range test on a continuous variable such as a Number or Date is defined by a minimum and maximum value separated by two dots, enclosed in either parentheses or square brackets. Parenthesis means the end point is excluded from the range; square bracket means it is included in the range. If the opening character is parenthesis, it is allowed for the closing character to be bracket, and vice versa.
Quick Tip: by pressing CTRL+SPACE while on a selected cell in a decision table, you will be able to access the auto-complete menu for the cell.
Generalized Unary Tests
In addition to simple unary tests, an input cell may contain a generalized unary test, meaning any FEEL expression in which the column heading is replaced by the ? character. For example, you could replace the simple unary test in rule 1 column 1 with the generalized unary test
ends with(?, "Accident")
When generalized unary tests are used, it is no longer possible to use DT Analysis. Note that datatype definitions are specified as generalized unary tests.
Allowed Values
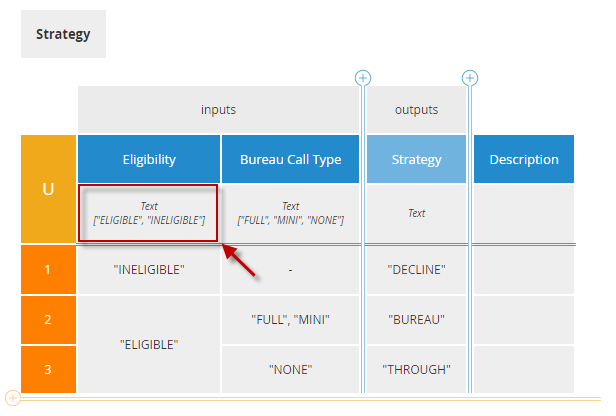
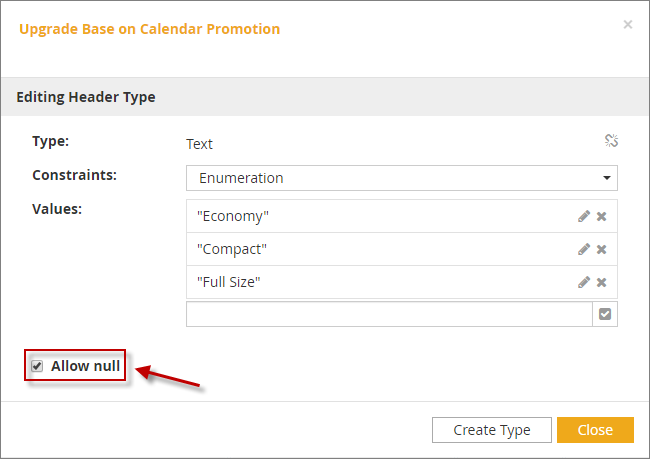
In a decision table it is possible to define allowed values for an input or output even when it is assigned to an unconstrained base type. When you click on the base type name (see the picture below) you can define constraints applicable only in this decision table.
and a dialog like the following will be displayed:
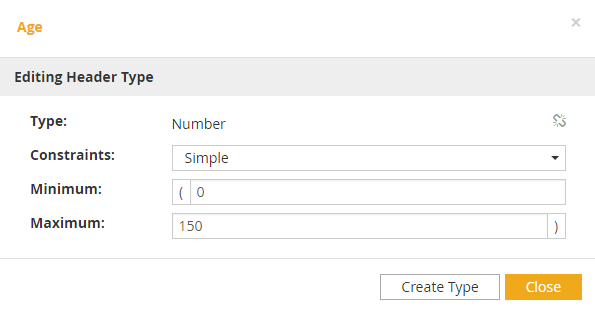
However, it is generally preferable to define the constraints as a named item definition, in which case it is applicable to this variable anywhere in the model. If you add constraints to a base type in a decision table heading, you can convert it to a named item definition by clicking the Create Type button.
When editing your header type, if you have a constraint set, you can click on the "Allow null" check-box (see the picture below) to allow the possibility when editing cells to add null as a correct value.
Hit Policy
The hit policy code in the upper left of the decision table determines output selection when multiple rules match. If rules do not overlap, meaning it is possible only for one rule to match, hit policy U (Unique) is appropriate. If overlapping rules always have the same output value, hit policy A (Any) is usually appropriate. If overlapping rules have different output values, you can use either hit policy P (Priority) or F (First). Hit policy P requires enumerated output values. Priority is established by the order of the values, earlier values having higher priority, and when multiple rules match, the one with highest priority is selected. Hit policy F selects the first rule that matches as the output.
Hit policies C, R, and O return a list of the outputs of all matching rules, i.e. a collection. For hit policy C, the order is not specified. Hit policies R and O, which are almost never seen in practice, specify the ordering as rule order (like F) or priority order (like P), respectively. With numeric outputs, hit policy C may have an aggregation attribute, in which case it returns a single value, not a list. Aggregation + returns the sum of the matched outputs; > returns the maximum value; < returns the minimum value; and # returns the count of matched outputs.
Hit Policy |
Code |
Behavior |
Comment |
Unique |
U |
Rules may not overlap. |
Easiest to interpret, but may be hard to construct |
Any |
A |
Overlapping rules must have same output value |
Often easier to construct and fewer rules than U |
Priority |
P |
Overlapping rules may have different output values. Select the match with highest priority. |
Often easiest to construct, fewest rules, but subject to rule masking and misleading rules. Best used with “else rule” |
First |
F |
Overlapping rules may have different output values. Select first matching rule. |
Deprecated as procedural, not declarative. Sometimes the easiest way to formulate the logic |
Collect |
C |
Collect all matching rule outputs in a list Output order undefined. |
May be used with aggregation code: + (sum), > (max), < (min), # (count) |
Rule |
R |
Collect all matching rule outputs in a list |
List outputs in rule order |
Output |
O |
Collect all matching rule outputs in a list |
List outputs in priority order |
Working with Decision Tables
There are several options available to format and easily work with decision tables. You can add, move, or delete rows and columns or merge cells in adjacent rows. You can also cut, copy, and paste rows or columns from the context menu.
These functions can be accessed by the buttons available in the decision table ribbon, or by using the context menu.

Inserting Rows and Columns
There are 2 ways to insert a new row or column to the decision table, either by clicking on the "plus" signs or by accessing the context menu of the element.
-
On the top and the bottom of the table, locate the "plus" sign and click on it to add a new rule or column.
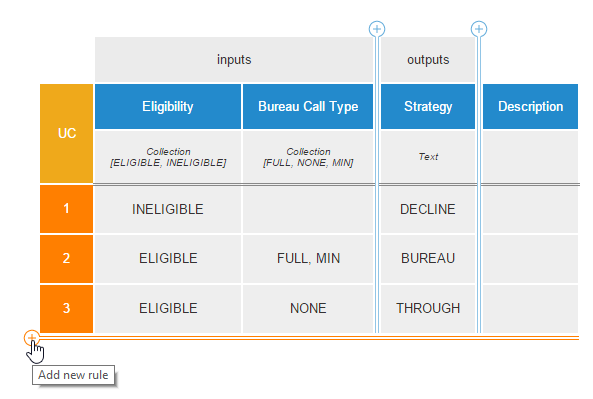
This will add a new rule to the bottom of the table.
-
Access the context menu by right clicking on the rule or column. Select the option where you wish to add a new rule or column.
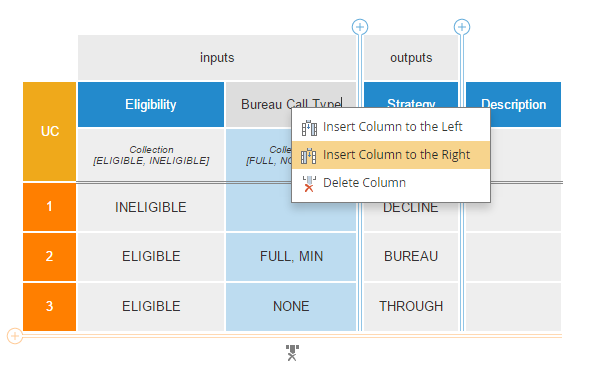
This will add a new column to the right of the selected one.
Moving Rows and Columns
In a decision tble, only the rows and columns can be moved, not individual cells. When rows or columns are moved, their associated cells are also moved to conserve the logic of the decision logic.
To move a row or column, click on it and drag it to the desired location.
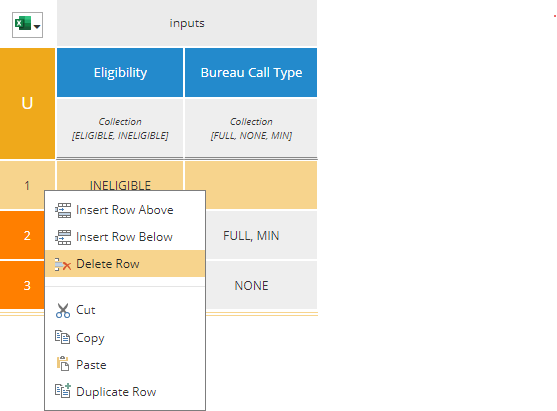
Delete Rows and Columns
There are multiple ways to delete a decision table row or column. The specific rule(s) or column(s) can be deleted from the context menu, or a single row or column can be deleted by clicking the delete icon at the end of the selected rule or column.
-
Access the context menu by right-clicking on a rule or column to delete. Select "Delete Rule or Column". This will delete the whole rule or column with all of its content.
-
Select the rule or column to delete, at the bottom or the far right of the selected column or rule, click on the delete icon
 This will delete the selected column or rule.
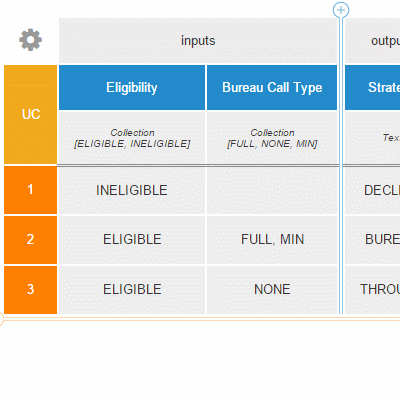
In addition, on the Home ribbon, the Delete button gives you the option to clear or delete your decision logic, as well as delete rows and/or columns.
Navigate to the "Cell" panel and click on the Delete button drop-down to be presented with the action you want to do.
.png)
From here you can select to:
-
Clear Logic: will clear the decision logic of all elements and format.
-
Delete Logic: will delete the whole decision logic and its page.
-
Delete Row: will delete the selected row.
-
Duplicate Row: will duplicate the selected rows.
-
Delete Column: will delete the selected column.
Mutiple Selection
Using Ctrl and/or Shift keys allows you to select/deselect multiple rows of a decision logic.
-
Ctrl allows selection to be extended by clicking on one row at a time.
-
Shift allows selection of all rows between two rows.
Several actions can be applied to the multiple lines selected (copy, cut, duplicate, delete, …)
| Multiple selections apply only to the same logics. |
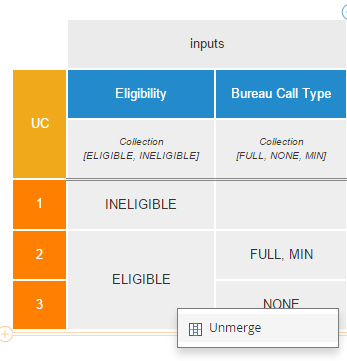
Cell Merging and Unmerging
Input entry cells (condition cells) with the same expressions in adjacent rows may be merged, unless the corresponding cells in the column to the left are not merged.
Select specific similar elements you wish to merge, release the mouse button and click on the "Merge" function. This will merge only the selected cells.
Alternatively, on the Home ribbon, The Merge Similar Cells action will automatically merge all input entry cells in adjacent rows with the same expression, regardless of the rule concerning cells to the left. In some cases, you will need to selectively unmerge those cells.
Navigate to the "Merge" panel and click on the Merge Similar Cells" button to merge all of the cells which have the same content.

This will keep merge all of the cells together which have the same content.